December 28, 2025

Life Cycle of a Thread (Thread States) in Java

In order to understand Java multi-threaded programming better you should have a good idea of Thread life cycle in Java and various thread states in Java.

Once you create a thread in Java a thread can be in one of the following states-

  • NEW
  • RUNNABLE
  • BLOCKED
  • WAITING
  • TIMED_WAITING
  • TERMINATED
Thread states in Java

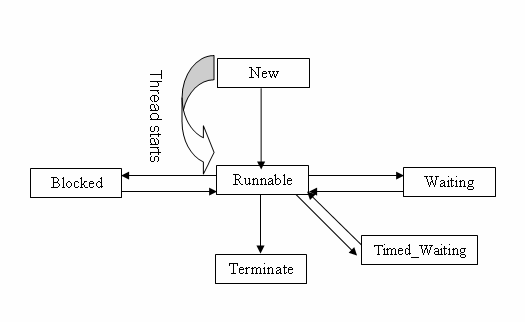
Thread states in Java explained

Various thread states in Java multi-threading are as follows.

  1. New State– A thread in Java is in new state when it is created but not yet started i.e. start() method is not called on the thread object.
  2. Runnable state- A thread transitions to a runnable state when start() method is called on the thread object. A thread in runnable state is scheduled to run by JVM but it may not start running until it gets CPU cycle.

    A Java thread after start running may change to one of these states- waiting, blocked, resumed running and terminated.

  3. Blocked state- A running thread can change state to blocked state and become temporarily inactive when it is waiting for a monitor lock. As example if one thread has entered a synchronized block other threads trying to acquire a lock to enter the same synchronized block will be blocked.
    synchronized (object reference) {   
      //critical section
    }

    Once the thread that has the lock releases it, scheduler will randomly pick one of the thread blocking on that synchronized block and change its state so it can resume running. A thread in blocked state won’t get any CPU time.

  4. Waiting state- A running thread may move to indefinite waiting state by calling either Object.wait() or Thread.join() method with out any time out parameter.

    A thread in the waiting state is waiting for another thread to perform a particular action. For example, a thread that has called Object.wait() on an object is waiting for another thread to call Object.notify() or Object.notifyAll() on that object. A thread that has called Thread.join() is waiting for a specified thread to terminate.

  5. Timed_Waiting state- A thread is in timed waiting state when it calls one of the following methods with a timed out parameter.

    • Thread.sleep
    • Object.wait with timeout
    • Thread.join with timeout
    • LockSupport.parkNanos
    • LockSupport.parkUntil

    For example-

    MyThread thread = new MyThread();
    thread.start();
    try {
      thread.sleep(500);
    } catch (InterruptedException e){
    
    }

    This code will cause the currently executing thread to sleep (temporarily cease execution) for 500 milliseconds.

  6. Terminated state- A thread that has completed execution goes into terminated state.

Getting Thread state in Java code

You can get thread state in Java by calling getState() method on the thread instance which returns a Thread.State enum.

class AnotherThread implements Runnable{
  @Override
  public void run() {
    System.out.println("run method of Another thread --" 
      + Thread.currentThread().getName());	
  }	
}

public class ThreadDemo {
  public static void main(String[] args) {
    Thread thread = new Thread(new AnotherThread(), "AnotherThread");
    Thread.State ts = thread.getState();
    System.out.println("Thread state-- " + ts.name());
    thread.start();
    System.out.println("Thread state after start-- " + thread.getState().name());
  }
}
Output
Thread state-- NEW
Thread state after start-- RUNNABLE
run method of Another thread --AnotherThread

That's all for the topic Life Cycle of a Thread (Thread States) in Java. If something is missing or you have something to share about the topic please write a comment.


You may also like

December 27, 2025

Java Immutable List With Examples

In Java 9 Immutable collections were added in Java that makes it easy to create an immutable List, Set or Map. In this article we’ll see how to use Immutable List in Java.

Elements cannot be added, removed, or replaced once an immutable list is created. Calling any mutator method on the List will always cause UnsupportedOperationException to be thrown.

Creating Immutable List before Java 9

Before Java 9 only way to create an immutable list was to use Collections.unmodifiableList(List<? extends T> list) method.

Here is an example showing how to create unmodifiable list before Java 9. In the program you can see that original list can still be changed (a new element is added to it). On the other hand unmodifiable list instance can’t be mutated.

import java.util.ArrayList;
import java.util.Collections;
import java.util.List;

public class ImmutList {
  public static void main(String[] args) {
    List<String> numList = new ArrayList<>();
    numList.add("1");
    numList.add("2");
    numList.add("3");
    numList.add("4");
    // Creating Immutable List
    List<String> anotherList = Collections.unmodifiableList(numList);
    numList.add("5");
    System.out.println("Number List- " + numList);
    // This throws exception
    anotherList.add("6");
  }
}
Output
Number List- [1, 2, 3, 4, 5]
Exception in thread "main" java.lang.UnsupportedOperationException
	at java.base/java.util.Collections$UnmodifiableCollection.add(Collections.java:1058)
	at com.knpcode.proj.Programs.ImmutList.main(ImmutList.java:18)

Another way to do that is to use Arrays.asList() method, which is less verbose.

import java.util.Arrays;
import java.util.Collections;
import java.util.List;

public class ImmutList {
  public static void main(String[] args) {
    List<String> numList = Arrays.asList("1", "2", "3", "4");
    // Creating Immutable List
    List<String> anotherList = Collections.unmodifiableList(numList);
    numList.add("5");
    System.out.println("Number List- " + numList);
    // This throws exception
    anotherList.add("6");
  }
}

Using this way even in the original list elements can’t be added.

Creating Immutable List Java 9 onward

Java 9 onward there are two static factory methods which provide a convenient way to create unmodifiable lists.

  1. List.of (Added in Java 9)
  2. List.copyOf (Added in Java 10)

The List instances created by these methods have the following characteristics:

  • They are unmodifiable. Elements cannot be added, removed, or replaced. Calling any mutator method on the List will always cause UnsupportedOperationException to be thrown. However, if the contained elements are themselves mutable, this may cause the List's contents to appear to change.
  • Null elements can't be added to immutable list. Attempts to create them with null elements result in NullPointerException.
  • They are serializable if all elements are serializable.
  • The order of elements in the list is the same as the order of the provided arguments, or of the elements in the provided array.
List.of method example

List.of() static method has both fixed-argument form and varargs form.

Fixed-argument form provides options to create list from 0 to 10 elements and the form of these method is as follows.

of()- Returns an unmodifiable list containing zero elements.
of(E e1)- Returns an unmodifiable list containing one element.
of(E e1, E e2)	Returns an unmodifiable list containing two elements.
..
..
of(E e1, E e2, E e3, E e4, E e5, E e6, E e7, E e8, E e9)- Returns an unmodifiable list containing nine elements.
of(E e1, E e2, E e3, E e4, E e5, E e6, E e7, E e8, E e9, E e10)- Returns an unmodifiable list containing ten elements.

Method to add arbitrary number of elements (varargs)

of(E... elements)- Returns an unmodifiable list containing an arbitrary number of elements.
import java.util.List;

public class ImmutList {
  public static void main(String[] args) {
    List<String> numList = List.of("1", "2", "3", "4");    
    System.out.println("Number List- " + numList);
    // Throws exception
    numList.add("5");
  }
}
List.copyOf method example

Using copyOf() method you can create an immutable list using an existing collection. If the Collection, used to create Immutable list, is subsequently modified, the returned List will not reflect such modifications.

import java.util.ArrayList;
import java.util.List;

public class ImmutList {
  public static void main(String[] args) {
    List<String> numList = new ArrayList<>();
    numList.add("1");
    numList.add("2");
    numList.add("3");
    numList.add("4");
    List<String> iList = List.copyOf(numList);    
    System.out.println("Immutable List- " + iList);
    // change original collection
    numList.add("5");
    System.out.println("Immutable List- " + iList);
  }
}
Output
Immutable List- [1, 2, 3, 4]

As you can see numList which is used to create the immutable list is later changed but that change doesn’t get reflected in the immutable list.

That's all for the topic Java Immutable List With Examples. If something is missing or you have something to share about the topic please write a comment.


You may also like

December 26, 2025

HashSet Internal Implementation in Java

HashSet internal implementation in Java or how does HashSet work internally in Java is a very important interview question. Some of the important points that you should know are-

  1. What is the backing data structure for HashSet or where does HashSet stores its element?
  2. How does add() method work in HashSet?
  3. How does remove() method work in HashSet?
  4. How elements are retrieved from HashSet?

In this post we’ll go through the internal implementation of HashSet in Java and try to explain the above mentioned points. Note that all the code snippet of the HashSet class provided in this post are from JDK 10.

Since HashSet internally uses HashMap for its operations so knowing HashMap Internal Implementation in Java will help a lot in understanding internal implementation of HashSet.

Where does HashSet store its element

Internally HashSet in Java uses HashMap to store its elements. With in HashSet class a HashMap is defined that is used to store its elements.

private transient HashMap<E,Object> map;

If you see all the defined constructors for HashSet, all of those constructors create a HashMap.

public HashSet() {
  map = new HashMap<>();
}

public HashSet(Collection<? extends E> c) {
  map = new HashMap<>(Math.max((int) (c.size()/.75f) + 1, 16));
  addAll(c);
}

public HashSet(int initialCapacity, float loadFactor) {
  map = new HashMap<>(initialCapacity, loadFactor);
}

public HashSet(int initialCapacity) {
  map = new HashMap<>(initialCapacity);
}

Initial capacity, load factor and buckets in HashSet

You should have clear understanding of the terms initial capacity, load factor and buckets to understand internal implementation of HashSet better.

As already mentioned HashSet uses HashMap to store its elements and HashMap in turn internally uses an array of type Node to store elements where Node<K, V> is an inner class with in HashMap class.

  • Capacity- If you don’t specify any capacity while creating HashSet then the array will have default initial capacity of 16. If you use the constructor where initial capacity is also passed then the array will have the specified initial capacity.
  • Bucket- In HashMap concept of bucket is used for storing elements where each index of array is conceptualized as one bucket. So, total there are 16 (in default case) buckets. For every (value) that is added to HashSet a hash is calculated using the key, based on that hash value one of these buckets is chosen to store the element.
  • Load factor- Load factor is the threshold for the HashSet storage. Once the threshold is reached the capacity of the HashSet is doubled. Default load factor is 0.75 which means if the 75% of the capacity is reached the HashSet is resized.

How does add method work in Java HashSet

You must be thinking if internally HashSet uses HashMap for adding elements then how come add(E e) method in HashSet takes only value as argument not a (key, value) pair. After all HashMap stores its element as (key, value) pair.

In Java HashSet implementation; from the add(E e) method, put() method of HashMap is called for adding the element and a (key, value) pair is sent too from HashSet. What internally happens is that the value passed for adding to the HashSet becomes the key for HashMap and a dummy object “PRESENT” is always added as value.

Dummy object PRESENT is defined in HashSet implementation as follows-

// Dummy value to associate with an Object in the backing Map
private static final Object PRESENT = new Object();

The implementation of add(E e) method is as follows-

public boolean add(E e) {
  return map.put(e, PRESENT)==null;
}

Here you can see that value passed for storing in HashSet becomes the key in the HashMap. Actually that's how it's ensured that only unique values are stored in HashSet. In HashMap value may be duplicate but Key should be unique. As we have seen that the value becomes key in HashMap which remains unique.

How values are retrieved from HashSet

There is no method in HashSet to get an individual value. You can iterate over the HashSet and get all the values though. The iterator method of the HashSet returns the keySet of the backing HashMap. We have already seen the values added to the HashSet becomes key in the HashMap so what you actually get is the values of the HashSet.

keySet()- Returns a Set view of the keys contained in this map.

The implementation of iterator() method is as follows-

public Iterator<E> iterator() {
  return map.keySet().iterator();
}

How values are removed from HashSet

For removing the value same interchange happens. What you provide as value for removing in the remove() method of the HashSet becomes the key while making a call to backing HashMap’s remove() method.

public boolean remove(Object o) {
  return map.remove(o)==PRESENT;
}

Here note that the remove method of the HashMap returns the value associated with key. Now we know that the value is always passed as "PRESENT" while adding to HashMap, that’s why the comparison map.remove(o)==PRESENT;

Important points

  1. HashSet is backed by a HashMap instance.
  2. In the internal implementation of the HashSet a dummy object “PRESENT” is always added a value to the backing HashMap. The value passed to add to HashSet becomes key in the HashMap.
  3. When the hash is calculated for HashSet it is calculated using the value itself as value has become in the HashMap.

That's all for the topic HashSet Internal Implementation in Java. If something is missing or you have something to share about the topic please write a comment.


You may also like

Remove Spaces From a String in Java - trim(), strip()

In this post you’ll learn how to remove spaces from a String in Java, the spaces may be leading spaces, trailing spaces or spaces in between the words. String class provides following options for removing String spaces in Java.

  • If you want to remove spaces at the beginning (leading spaces) and spaces at the end (trailing spaces) best way to do it is to use trim() method of the Java String class. As per trim() method space is defined as any character whose codepoint is less than or equal to 'U+0020' (the space character).
  • Java 11 onward there is also strip() method in Java String class for removing leading and trailing white spaces. This method internally uses the Character.isWhitespace() to check for whitepsaces. There are two more methods for removing either leading spaces or trailing spaces.

    If you want to remove only trailing white spaces then you can use-

    • stripLeading()- To remove all leading white spaces. Available Java 11 onward.

    If you want to remove only leading white spaces then you can use-

    • stripTrailing()- To remove all trailing white spaces. Available Java 11 onward.
  • Another option is to use replaceAll() method of the Java String class, passing regex ‘\\s+’ as an argument for removing spaces. This option removes spaces in between the words too apart from leading and trailing spaces.

One thing to remember here is that whenever string is modified in anyway a new String is created as String is immutable in Java, so you need to assign the modified string to a String reference.

Removing spaces using trim() method Java example

  • trim()- Returns a string whose value is this string, with all leading and trailing space removed, where space is defined as any character whose codepoint is less than or equal to 'U+0020' (the space character).
public class StringSpaces {
  public static void main(String[] args) {	
    String str = "  Hello    World		";
    str = str.trim();
    System.out.println("String- " + str);
  }
}
Output
String- Hello    World

As you can see leading and trailing spaces are removed though not the spaces in between the words.

Removing spaces using strip() method Java example

Java 11 onward there is also a strip() method in Java to remove leading and trailing spaces from a String. strip() method internally uses Character.isWhitespace() to check for white spaces which provides a much wider definition of whitespaces than trim(). In trim() space is defined as any character whose codepoint is less than or equal to 'U+0020' (the space character).

Let’s try to clarify it with an example where a unicode character '\u2002' is used which is not recognized by trim() method.

public class StringSpaces {
  public static void main(String[] args) {
    String str = '\u2002'+"Hello World!"+ '\u2002';
    System.out.println("String-" + str);
    str = str.trim();
    System.out.println("String-" + str);
  }
}
Output
String- Hello World!

You can see that the leading and trailing spaces are not removed by the trim() method as unicode character greater than '\u0020' is used. Using strip() method you can remove these spaces.

public class StringSpaces {
  public static void main(String[] args) {
    String str = '\u2002'+"Hello World!"+ '\u2002';
    System.out.println("String-" + str);
    str = str.strip();
    System.out.println("String-" + str);
  }
}
Output
String- Hello World!
String-Hello World!

Removing spaces using replaceAll() method Java example

If you have to remove spaces in between the words too apart from leading and trailing spaces then replaceAll() method can be used.

  • replaceAll(String regex, String replacement)- Replaces each substring of this string that matches the given regular expression with the given replacement.

By passing "\\s+" as regex which matches one or many whitespaces and "" as replacement for those whitespaces you can remove all whitespaces from a String.

public class StringSpaces {
  public static void main(String[] args) {	
    String str = "  Hello    World		";
    str = str.replaceAll("\\s+", "");
    System.out.println("String- " + str);
  }
}
Output
String- Hello World!
String- HelloWorld

That's all for the topic Remove Spaces From a String in Java - trim(), strip() Methods. If something is missing or you have something to share about the topic please write a comment.


You may also like

December 23, 2025

final in Java With Examples

final keyword in Java can be used with a field, method or class. In whichever context you use final in Java, it restricts the access in some way.

  • Final variable– If a field is declared as final its value can’t be changed once assigned.
  • Final method– A method declared as final can’t be overridden.
  • Final class– A class declared as final can’t be extended.

Final variable in Java

When a field is declared as final it can’t be modified thus making it a constant. Since a final variable is constant it is considered good practice to give final variable name in all uppercase.

Since the value of a final variable can’t be modified so final variable can be initialized only once. That initialization can be done in following ways-

  • You can initialize a final variable when it is declared. As example- final int WEEK_OF_DAYS = 7;
  • you can defer the assignment to do it in a constructor, initializer block or static block (if field is static too along with final). A final variable that is not initialized when it is declared is called a blank final variable in Java.

Examples of final field in Java

When declared but not initialized– In that case you will get a compile time error that the blank final field may not have been initialized.

final blank variable
Initializing final field in a constructor
public class FinalDemo {
  final int DAYS_IN_WEEK;
  FinalDemo(){
    DAYS_IN_WEEK = 7;
  }

  public static void main(String[] args) {
    FinalDemo finalDemo = new FinalDemo();
  }
}
Initializing final field in an initializer block
public class 
public class FinalDemo {
  final int DAYS_IN_WEEK;
  {
    DAYS_IN_WEEK = 7;
  }

  public static void main(String[] args) {
    FinalDemo finalDemo = new FinalDemo();
  }
}
Initializing static final field in a static block
public class 
public class FinalDemo {
  final static int DAYS_IN_WEEK;
  static{
    DAYS_IN_WEEK = 7;
  }
  public static void main(String[] args) {
    FinalDemo finalDemo = new FinalDemo();
  }
}

Trying to change value of a final field – That will result in compiler error as final field can’t be modified once initialized.

final constant java

Final variable in a method

In the above examples final field was at the class level but you can have a final variable in the methods too. Declaring a local variable final has the same effect too; value can’t be assigned to it more than once.

Even method parameters can be declared final in Java so that the parameter values can’t be changed. For example- public void getValue(final int amount, final int years)

Final variable holding object reference

In case of final variable holding an object reference you can change the value of any object field but you can’t change the reference held by the final variable. That makes sense because in case of object reference the value of the variable is the memory reference so that can’t be changed in case it is final. Let’s see an example.

Final object reference Java example

Here we have an Employee class with age and name fields. A final variable employee holds reference to an Employee object. In the code you can see that field values can be changed but trying to change the reference employee = new Employee(); will cause compile time error.

class Employee{
  int age;
  String name;
  public int getAge() {
    return age;
  }
  public void setAge(int age) {
    this.age = age;
  }
  public String getName() {
    return name;
  }
  public void setName(String name) {
    this.name = name;
  }
}

public class FinalDemo {
  final int DAYS_IN_WEEK = 7;

  public static void main(String[] args) {
    // final variable holding object reference
    final Employee employee = new Employee();
    // setting field values
    employee.setAge(25);
    employee.setName("Jack");
    System.out.println("Employee Age " + employee.getAge());
    // changing field value - That is OK
    employee.setAge(35);
    System.out.println("Employee Age " + employee.getAge());
    // Can't change the reference 
    employee = new Employee(); // Compiler error
  }
}

Final Method in Java

You can also declare a method as final in Java making it a final method. A final method can’t be overridden.

If a method is declared as final in the parent class then child classes can’t override that method and change the implementation.

If you have any method in the class which you consider complete functionality wise, then you can declare it as final method so that the same implementation is used by the child classes.

Final method Java example
final method in Java

Here you can see that trying to override displayValue() method in the child class results in compiler error- Cannot override the final method from Parent

final method performance benefits

Declaring methods as final may also result in performance improvement in your code. In Java calls to methods are generally resolved at run time which is known as dynamic or late binding.

When you mark a method as final, Java compiler knows that the method can't be overridden, so call to that method can be resolved at compile time itself. This is known as static or early binding. If the method call is resolved at run time then the method can be inlined meaning the method code can be put at the place from where it is called. That avoids the overhead of method call at runtime resulting in performance improvement.

Final class in Java

If you declare a class as final in Java then that class can’t be extended (You can’t inherit from a final class). In Java declaring a class as final helps in the following ways-

  1. If you have a class where you are sure that it has all the required functionality and should not be subclassed to add any extra functionality then it should be declared as final in Java.
  2. Another particularly useful scenario where marking a class as final is needed is when creating an immutable class like the String class.
Final class example
final class in Java

Note that you can't declare a class as both final and abstract in Java. As abstract class by design relies on subclass to provide complete implementation so restricting it by marking a class as final too is a contradiction thus not permitted.

final and abstract

That's all for the topic final in Java With Examples. If something is missing or you have something to share about the topic please write a comment.


You may also like

December 17, 2025

Java var Type (Local Variable Type Inference)

In this post we’ll discuss a feature called local variable type inference which is included in Java 10. A new reserved type name "var" is added in Java to define and initialize local variables. Note that var is not a keyword, it’s a reserved type name. So your existing variable named var still works and you can still create any field, method, package named var.

Type inference in Java

First let’s try to understand what exactly is this type inference.

String str = "test";

List<String> cityList = List.of("New Delhi", "Chicago", "London");

In the above two statements types on the left hand-side may feel redundant and obvious. Java being a static type language requires that type of each variable has to be declared explicitly, even if type is obvious you have to declare it.

var type introduced in Java 10 helps in reducing that verbosity in the code by inferring the type of the local variable using the expression on the right side. You no longer need to declare the type of the variable, it will be inferred by the compiler from the variable initializer. So, the above two statements can now (Java 10 onward) be written as.

var str = "test";
var cityList = List.of("New Delhi", "Chicago", "London");

Let’s see if the type is inferred or not-

System.out.println("Type of str- " + str.getClass().getName());
System.out.println("Type of cityList- " + cityList.getClass().getName());

gives output as-

Type of str- java.lang.String
Type of cityList- java.util.ImmutableCollections$ListN

So you can see how using var, type of the local variable is inferred by the compiler itself rather than you explicitly declaring the type of each variable.

The main advantage of local variable type inference feature is to reduce boilerplate variable type definitions and to increase code readability.

Since most of the libraries in Java are made up of generic classes and methods that means you will have more and more generics parameterized by further generic types. Here is an example showing such a scenario where you need to iterate a HashMap of ArrayLists of String.

Map<String, List<String>> citiesCountryWise = new HashMap<String, List<String>>();
// getData() method provides the data
citiesCountryWise = getData();

// iterating over a map
for(Map.Entry<String, List<String>> entry : citiesCountryWise.entrySet()){
    // iterating over a list
    for(String cityName : entry.getValue()){
        System.out.println("City - " + cityName);
    }
}

Using local variable type inference the same code can be shorten to aid readability.

var citiesCountryWise = new HashMap<String, List<String>>();
citiesCountryWise = getMap();

// iterating over a map
for(var entry : citiesCountryWise.entrySet()){
    // iterating over a list
    for(String cityName : entry.getValue()){
        System.out.println("City - " + cityName);
    }
}

Points about local variable type inference

1. Each of the expressions using var still has a static type i.e. the declared type of a value. This means that assigning a different value will fail.

For example in the following statement type of i is inferred as int by compiler

var i = 10;

Now this type can't be changed, any such attempt results in compile time error.

i = "test"; // Type mismatch: cannot convert from String to int

2. var doesn’t work well with polymorphic code. For example let’s take a simple class hierarchy of Animal as a super class and two child classes Cat and Dog.

In that case if the Object of class Cat is created as given below

var c = new Cat();

Then what would be the type of c? Animal or Cat? As already stated type of the local variable is the type of the initializer so c is of type Cat here.

Trying to make following assignment results in error.

c = new Dog(); // Type mismatch: cannot convert from Dog to Cat

So the polymorphic code that we can usually write as follows is not possible with var.

Animal a = new Cat();
a = new Dog();

3. var is used for local type inference so it can’t be used with fields and in method signatures. Following is not possible.

public void display(var str) { 
  ....
  ....
}

4. You cannot use local variable declarations without an explicit initialization. Since type is inferred from the expression on the right side so having that is mandatory.

var a; // Cannot use 'var' on variable without initializer

5. var variable cannot be initialized to null. With null, type is not clear so any such assignment results in compile time error.

var a = null; //Cannot infer type for local variable initialized to 'null'

6. You cannot use var with lambda expressions because they require an explicit target-type.

var x = (a, b) -> a+b;

This lambda expression will fail with the compilation error "Lambda expression needs an explicit target-type"

That's all for the topic Java var Type (Local Variable Type Inference). If something is missing or you have something to share about the topic please write a comment.


You may also like

December 16, 2025

Interface in Java With Examples

Interface in Java helps to fully abstract the implementation of the class. Interfaces act as a contract for the class, detailing what methods can be invoked by any outside entity without actually providing what methods should do. The class implementing an interface has to provide the behavior (implement the methods defined in interface).

How is interface created in Java

An interface in Java is created by using the interface keyword. All fields in an interface are automatically public, static, and final. Methods in an interface have no body (only method signature), are public and abstract by default.

Note that Java 8 onward interfaces can have default methods and static methods and Java 9 onward private methods in interface are also permitted. In this post we’ll discuss interfaces in its normal and original form.

Syntax of interface in Java

access_modifier interface Interface_Name{
  type var1 = value;
  type var2 = value;

  return_type methodName1(arguments);
  return_type methodName2(arguments);

  ..
  ..
}

Valid access modifiers for interface are default access (if no access modifier is specified) and public. Default means interface is available only in the package where it is created, public means it can be accessed from all the other packages too.

Note that the method signatures are terminated with a semicolon, there is no implementation.

Creating and implementing an interface in Java

In this Java example there is an interface Payment with one method doPayment(double amount) which is implemented by two classes CashPayment and CCPayment.

public interface Payment {
  void doPayment(double amount);
}
Implementing classes

To use an interface, you write a class that implements the interface. A class implementing an interface in Java must implement all methods defined by that interface before the class successfully compiles. If class is not implementing all the methods of the interface then it should be declared as an abstract class.

public class CashPayment implements Payment {
  @Override
  public void doPayment(double amount) {
    System.out.println("Cash payment of amount- " + amount);
  }
}

public class CCPayment implements Payment {
  @Override
  public void doPayment(double amount) {
    System.out.println("Swipe credit card for amount- " + amount);
  }
}

As you can see here one interface is defined which just declares a method, leaving the method implementation to the classes that implement this interface. A class implementing an interface must include implements keyword in the class definition.

Features of interface in Java

Let’s go through some of the important points about interfaces in Java using the above example as reference.

  1. Interfaces in Java can’t have instance variables, only public, static, final constants. For example trying to add an instance variable in the Payment interface as- public String name; results in compile time error “The blank final field name may not have been initialized”.
  2. An interface in Java can’t be instantiated. Trying to create an instance of Payment interface like this- Payment payment = new Payment(); results in compile time error “Cannot instantiate the type Payment”.
  3. Since interfaces can’t be instantiated so interfaces in Java can’t have constructors.
  4. Though interface can’t be instantiated but an object reference of interface can be created. This object reference can refer to the instance of any class that implements this interface. That’s how interface in Java helps in achieving run time polymorphism. In the above example you can see that the reference of the interface Payment is created- Payment payment; which refers to the implementing class objects and call the appropriate doPayment() method. Method that has to be executed is looked up dynamically at run time.
  5. A class can implement more than one interfaces, that’s the only way you can have multiple inheritance in Java. Java doesn’t allow multiple inheritance in case of classes so you can’t extend more than one class in Java.
  6. Interfaces are separated by a comma when a class implements more than one interfaces.
    class class_name implements interface 1, interface 2{
       ..
       ..
    }
    

Interface extends another interface

A class implements an interface but an interface extends another interface in Java using the extends keyword. An interface can extend more than one interfaces.

When a class implements an interface that has inherited another interface then the class must implement all the methods in all those interfaces.

Java example
interface A{
  int add(int a, int b);
}

interface B extends A{
  int subtract(int a, int b);
}

public class MainClass implements B{
  @Override
  public int subtract(int a, int b) {
    return (a-b);
  }

  @Override
  public int add(int a, int b) {
    return (a+b);
  }
}

Nested interfaces in Java

A nested interface is an interface that is declared as a member of a class or another interface. Nested interface can have public, private, protected or default access and it must be qualified by a class name or interface in which it is declared when used.

class A{
  //nested interface
  interface MyInterface{
    int add(int a, int b);
  }
}

// Class implementing nested interface
class B implements A.MyInterface {
  @Override
  public int add(int a, int b) {
    return a+b;
  }
}

public class MainClass {
  public static void main(String[] args) {
    // Reference to nested interface
    A.MyInterface refObj = new B();
    int result = refObj.add(5, 6);
    System.out.println("Result- " + result);
  }
}
Output
Result- 11
That's all for the topic Interface in Java With Examples. If something is missing or you have something to share about the topic please write a comment.
You may also like

December 15, 2025

Polymorphism in Java – OOPS Concepts

This post talks about one of the OOPS concept polymorphism and the usage of polymorphism in Java.

What is polymorphism

Polymorphism is one of the four fundamental principles of Object Oriented Programming along with inheritance, abstraction and encapsulation.

Polymorphism is a Greek word where poly means “many” and morph means “change from one form to another”. In object oriented terms it relates to the same object reference taking many forms.

The concept of polymorphism in Java is designed as an interface having a method and the derived classes implementing the interface as per their requirement. Then using the reference of that single interface any of those implemented class methods can be invoked. So one interface reference can take many forms here based on which class it is referring to.

Polymorphism in Java

There are two types of Polymorphism in Java-
  1. Compile time polymorphism- Also known as static polymorphism. Static polymorphism in Java is achieved through Method overloading as it is known at compile time itself which of the overloaded method will be called.
  2. Runtime polymorphism- Also known as dynamic polymorphism. Dynamic polymorphism in Java is achieved through Method overriding. In method overriding it is resolved at run time which of the overridden method would be called.

Example of Run time polymorphism in Java

In the example there is an interface Payment with a method doPayment(double amount). This interface is implemented by two classes.

public interface Payment {
  void doPayment(double amount);
}
Implementing class -1
public class CashPayment implements Payment {
  @Override
  public void doPayment(double amount) {
    System.out.println("Cash payment of amount- " + amount);
  }
}
Implementing class -2
public class CCPayment implements Payment {
  @Override
  public void doPayment(double amount) {
    System.out.println("Swipe credit card for amount- " + amount);
  }
}
public class MainClass {
  public static void main(String[] args) {
    // Reference of CashPayment instance
    Payment payment = new CashPayment();
    payment.doPayment(106.78);
    // Now holding reference of CCPayment instance
    payment = new CCPayment();
    payment.doPayment(77.67);
  }
}
Output
Cash payment of amount- 106.78
Swipe credit card for amount- 77.67

As you can see at run time reference of Payment can refer to any of these implementations and based on the current reference that class’ method is called.

Example of Compile time polymorphism in Java

public class MainClass {
  public static void main(String[] args) {
    MainClass obj = new MainClass();	
    System.out.println("Addition Result- " + obj.add(7,  8));
    System.out.println("Addition Result- " + obj.add(123.56, 34.78));
  }

  public int add(int a, int b) {
    return a + b;
  }

  public double add(double a, double b) {
    return a + b;
  }
}

Here in the class there are two methods with the same name (add) but the types of parameters are different so these are overloaded methods. Based on the types of arguments passed in the method call appropriate add method is called. This binding is done at the compile time itself.

Output
Addition Result- 15
Addition Result- 158.34

That's all for the topic Polymorphism in Java – OOPS Concepts. If something is missing or you have something to share about the topic please write a comment.


You may also like